

If you’ve recently bought a new Acer C720 Chromebook, or in fact, any Chromebook, you may have noticed that the built-in storage is only 16 GB on most models. For a Chromebook, this is (usually) more than enough; all your storage is supposed to be in the cloud, and you really shouldn’t have anything running or stored locally beyond Chrome and maybe a few cache files.
However, if you’re a power user and wanting to have a lot more local storage, or you might be wanting to experiment with Crouton, you’re definitely going to want to upgrade from a 16 GB SSD (solid state drive, or flash memory). Fortunately, on the Acer C720, this process is really, really easy — the SSD isn’t soldered onto the main board like in most other Chromebooks, so the upgrade is as simple as ordering the new part, opening the case, inserting the new SSD, reinstalling Chrome OS, and you’re done!
Ordering the new 128 GB SSD
 The Acer C720 uses a NGFF M.2 Solid State Drive. These are becoming a little more common, but they’re still fairly hard to find especially in Australia. Fortunately, there is a local distributor for these drives, called Ram City.
You can pick up one of the required drives for $120.99 plus postage, and they’ll deliver within a day or two to most places within Australia. We had a minor hiccup with the ordering process ourselves, because Star Track screwed up the consignment, resulting in the delivery being delayed by a day.
However, the Ram City people were friendly, easy to deal with, and were only too happy to help us get the order right. If you’re going to upgrade your Acer C720, definitely consider these guys.
Creating a Chrome Restore USB stick
For this step, you will need either a USB drive or an SD card with at least 4 GB of space available. Please note that a 4 GB drive or card likely has less than 4 GB of space actually available, so you will probably need one of at least 8 GB to be safe.
Please note that this process will wipe all data from the card that is used.
Open a Chrome tab and go to chrome://imageburner while making sure that your USB driver or SD card is not inserted. Follow the on-screen instructions to easily make your recovery disk. The process will take a little while depending on the speed of your internet connection.
Installing the new drive
The first step in the process is to get the bottom case off the Acer C720, and this is done by removing all the phillips head screws on the bottom of the Chromebook. Make sure you’ve turned your Chromebook off first, and unplug it from the power.
There is a screw behind a “your warranty will be void if you remove this sticker” sticker, and unfortunately you’re just going to have to break the sticker to remove the last screw. It goes without saying that your warranty may be void if you break things while performing this upgrade … but it’s pretty easy!
Once all the screws are removed, using your fingernail or a thin plastic tool (we used a credit card to do the trick), separate the bottom of the case from the body of the Chromebook on one of the sides near the palm rest. Proceed gently, as the snaps holding the case together aren’t really designed to come apart, but if you’re gentle and persistent, you’ll remove the case without breaking anything.
Once you’ve removed the bottom cover, you’ll see a layout something like this:
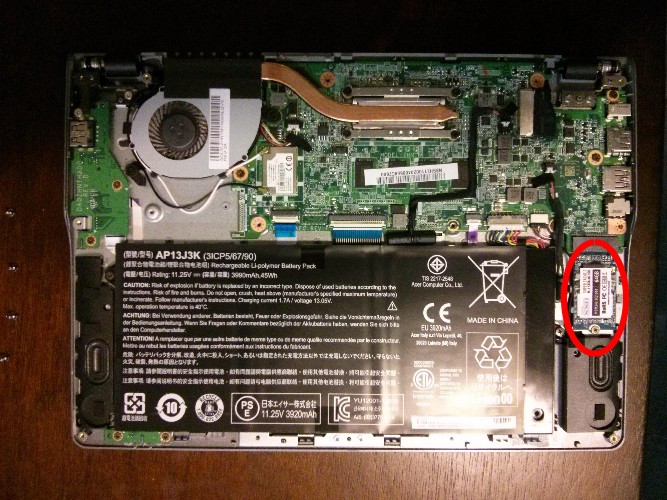
That little board with a white sticker (marked by the red circle, above) is the 16 GB SSD, and as you can see, it’s held in place with a single screw. Remove the screw, and gently remove the drive from your Chromebook. Keep it somewhere safe, as it contains a working copy of Chrome, so you can always go back to it if needed.
Carefully place the new SSD in the slot you removed the old one from, ensuring that it’s oriented the same way (in the case of the drive from Ram City, this will be with the label facing outwards, towards you). Screw it in place and ensure it’s a firm fit. Don’t over-tighten though.
Once the new SSD is in place, replace the bottom case of the Chromebook, and ensure all corners are pressed down (listen for the snapping sound). Replace all the screws and tighten, but not overly (otherwise you’ll either shred the screw-head or crack the plastic case).
Restore Chrome OS
Once the bottom case is replaced and screwed in place, flip the Chromebook right-side up, and power it on. You’ll see a window advising there’s something wrong with the storage media, asking you to plug in a recovery drive.
At this point, insert your recovery USB stick or SD card created earlier, and your Chromebook will automatically recognise it and restore ChromeOS, formatting your new SSD in the process to the full available size.
When ChromeOS loads, you’ll have as much space as you like to copy movies to your Chromebook, install Crouton, or whatever you please. Simples!


