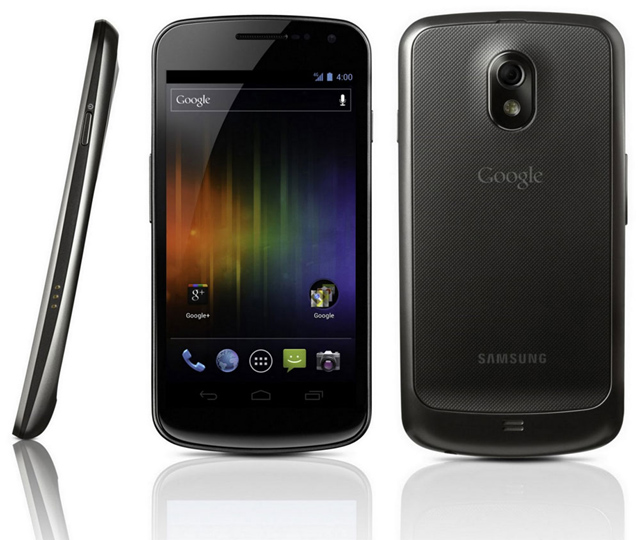
Ok, you’ve been patient, you’ve complained and you’ve pleaded but still you can’t get regular updates on your carrier branded Galaxy Nexus. Well, is it time to think about unlocking and putting on the international firmware to ensure that your phone gets updates?
Before we start, a minority of people will tell you the carrier branded phones are different hardware wise to the International unbranded Galaxy Nexus. To put it simply: They. Are. Wrong.
EDIT : This Guide is intended for Australian Carrier branded Galaxy Nexus phones, if you have a Verizon branded phone. DO NOT PROCEED any further.
Now there’s two ways to do this, the easy way and the hard way. The easy way will get the job done but the hard way you may actually learn a little about your phone and how to ‘hack’ it a little.
Please Note : While this is a pretty easy process, we don’t take any responsibility for you trashing your phone. We didn’t create these instructions or the software used. By proceeding, you take all responsibility for what you do with your property. If you have issues, we suggest checking the XDA-Developers forums for ideas on recovering from a particular issue. That said, you shouldn’t destroy your phone by doing this. It’s pretty safe.
Update: As of the 25th of July, the Android 4.3 Factory Image is now available and can be substituted in ‘The Hard Way’ section.
IMPORTANT : Unlocking your Bootloader WILL WIPE YOUR PHONE, this means EVERYTHING, SMSs, Pictures, Music, EVERYTHING. If you are not at all comfortable in doing this DO NOT PROCEED.
The Easy Way
Galaxy Nexus Toolkit
A team over at XDA regularly puts out toolkits for Nexus devices, these toolkits include the ability to unlock/lock your bootloader, install custom recovery, root your phone and most importantly install install the factory images from Google onto your phone.
First step is to go to the XDA Forum thread for the Galaxy Nexus Toolkit. Download the toolkit and install it, we also recommend if you find this helpful to make a donation, this means you can actually download updates through the toolkit rather than downloading and re-installing the updates everytime it’s updated.
Once you’ve installed, run the toolkit.
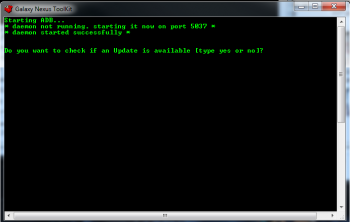
Step 1 : If you donated you can check for updates and type ‘Yes’, if not type ‘No’.
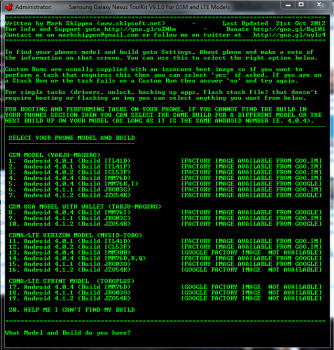
Step 2: Doesn’t really matter what you have here as the carrier firmware is not listed. Simply choose anything from 1-19 and hit enter.
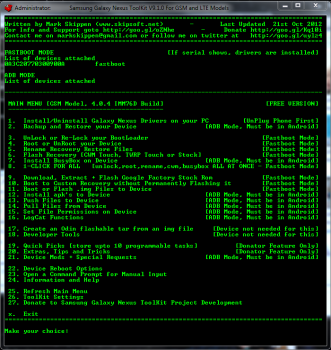
Step 3: You’ll need to install drivers to your PC, Make sure your phone is unplugged and choose ‘1’.
Step 4: Turn on USB Debugging, On your phone, go to Settings > Developer Options and tick the box next to ‘USB debugging’.
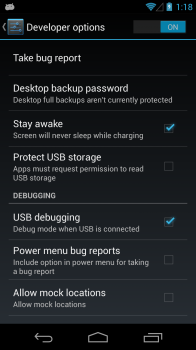
Step 5: Once you’ve plugged in your phone, select option ‘3’. It’s at this stage you’re about to unlock your bootloader.
It’s at this step everything on your phone will be wiped including internal storage: Pictures, Music, SMS Messages, EVERYTHING. Backup your phone first or stop if this bothers you too much.
Step 6: From this screen you’ll select Option ‘1. UnLock Bootloader.
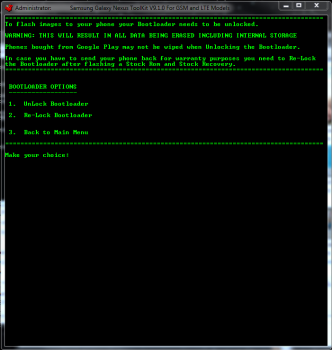
Step 7: You’ll then be asked if your phone is in Fastboot Mode and you are ready to continue. If your phone is just in Android type No and your phone will reboot and your phone will reboot and come to this :
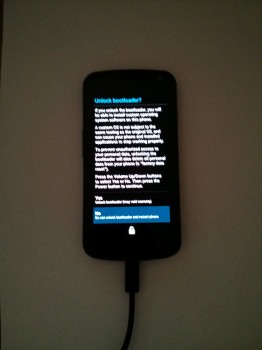
The next step will unlock your bootloader and delete everything on your phone. Proceed with caution!
Once you’re at that screen use the volume up/down buttons to highlight ‘Yes’ and then hit the power button to select. This will delete your data and unlock your bootloader. You will then be returned to the Fastboot screen :
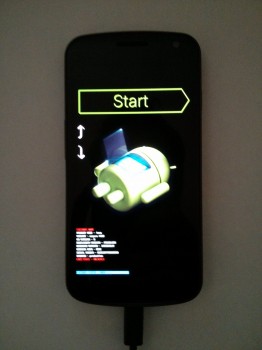
Step 8: Your Bootloader is unlocked and the Galaxy Nexus Toolkit will take you back to the Main Menu.
Now a Note:
At time of writing the Galaxy Nexus Toolkit is only setup to download the Android 4.1.2 (Build JZO54K), but this is OK, because the OTA is rolling out and as soon as it’s flashed when your phone boots into Android, you should be prompted to download the OTA and then it will just update.
Step 9: Download the Factory Image, Select option ‘9’ from the Main Menu, then select option ‘1. Download Google Stock Image’
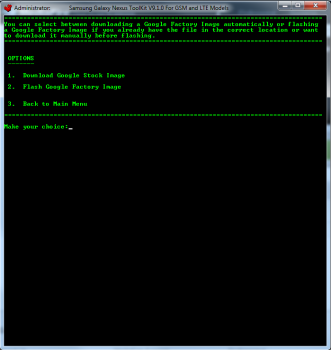
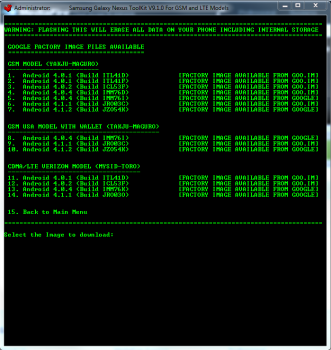
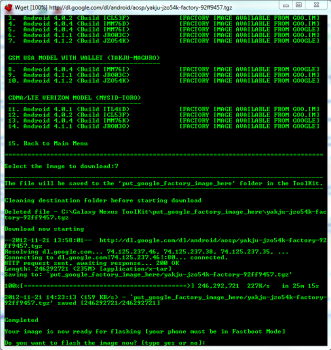
Step 10: Select ‘7. Android 4.1.2 (Build JZO54K)’. Note: This takes a while, factory images are 300MB+ to download.
Step 11: Once it completes you’ll be asked if you wish to flash the image now. Select ‘Yes’
Step 12: You will now be asked if your phone is in Fastboot mode.
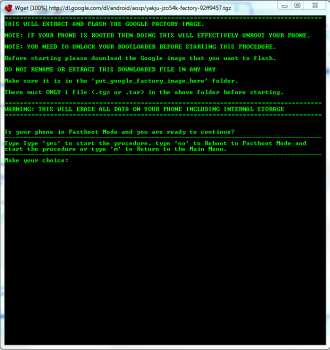
If you have done everything so far your phone screen should have this on it:

If it does, type ‘Yes’
If you are back in Android, type ‘No’ Your phone will then reboot and continue.
Note: This takes a couple of minutes to do. DO NOT DISCONNECT YOUR PHONE AT THIS TIME
Step 13: Once Completed, your phone will boot into Android. The Galaxy Nexus Toolkit will now go back to the Main Menu.
Congratulations, that wasn’t so hard was it?
Notes: You have just flashed Android 4.1.2 to your device, it is the Yakju build so if you need any OTA files you just have to get the Yakju file. The Yakju OTA is rolling out now, so you should receive a prompt to download and install it pretty quickly once you’ve flashed your phone.
The Hard Way
Ok, You decided to go the ‘Hard Way’, Kudos. The advantage of this way is you will install the Android 4.2 image straight to your phone, no messing around with 4.1.2 and waiting for OTA as in the Easy Way.
First step: Install the pre-requisites
- You must have the Android SDK installed and be able to access and use adb and fastboot.
- You must have USB debugging enabled on your Galaxy Nexus. On your phone, go to Settings > { } Developer Options and tick the box next to ‘USB debugging’
Second Step: Download the Factory Image from Google
- Go to the Google Developers Factory Images page.
- Underneath the heading Factory Images “yakju” for Galaxy Nexus “maguro” (GSM/HSPA+), Click the link for Android 4.2 (JOP40C)

- This will take you to the actual link, click on the link and you will be prompted to download the file ‘yakju-jop40c-factory-267d243c.tgz’. Save this file to somewhere on your hard drive you can find again.

- Once downloaded extract the tgz file to a directory using a compression tool such as WinRAR
- Copy all the files contained in the folder to the same folder as Fastboot resides in when you installed the Android SDK, this should be something like : ‘C:\program files (x86)\android\android-sdk\platform-tools’
Third Step: Unlock that bootloader
Note: This will wipe whatever is on your phone, ensure you’ve backed up everything as this wipes all Internal storage : Music, Pictures, SMS Messages: EVERYTHING! You Have Been Warned.
- Connect your Galaxy Nexus to your PC/Mac via the USB cable that came with it.
- Launch Terminal (Mac) or Command Prompt (Windows)
- Navigate to the fastboot/adb folder which will be inside the location where the Android SDK is installed (On Windows, it should be in C:\program files (x86)\android\android-sdk\platform-tools). On Mac, it’ll be in whatever folder you’ve unzipped the SDK to, and in that same platform-tools folder.
- Enter the following command:
fastboot devices
You should see your device ID. If you don’t, you don’t have the proper driver installed and should make sure you have the USB driver installed from the SDK download, if you have issues with drivers don’t worry you’re not the first, I actually had to install PDANet to get the correct drivers installed.
Note: Mac users probably won’t have this issue – no driver is required.
- Enter the following command:
fastboot oem unlock
From here, on your phone you’ll be prompted to select Yes or No as to whether you want to unlock your bootloader.

On your phone, use the volume up/down buttons to highlight ‘Yes’ and then hit the power button to select. This will unlock your bootloader. You will then be returned to the Fastboot screen :

If you didn’t get a device ID from step 4 and you moved to this step by mistake, it will be stuck on “Waiting for Device”. Make sure you have the USB drivers installed, Windows users.
- It should say Start in the top right. Hit the power button to reboot.
If you decide for whatever reason to re-lock the bootloader (e.g. you might want to return the phone to factory stock and sell it to a friend), simply substitute
fastboot oem lock
Fourth Step: Flash that 4.2 Build
- You should still be in the bootloader screen, if not, turn off your Galaxy Nexus. Then hold down the Volume Up+Volume Down+Power button all at the same time and you should be now be in fastboot mode on your phone :

- In your command prompt/terminal window you should be in the directory containing the fastboot.exe file and the extracted files from the ‘yakju-jop40c-factory-267d243c.tgz’ file you downloaded previously.
- At the prompt type in
flash-all.bat
Fifth Step: Options
Either lock your bootloader as per above or enjoy your carrier unbranded Galaxy Nexus
I have tried to be as comprehensive as possible with these instructions and I did every step with my own Galaxy Nexus but it is originally an internationally unbranded Galaxy Nexus, if you run into any difficulties, trawl through the XDA Forums as there are many people there who have most likely run into the exact same issue you have already.



Okay, tri it won’t work the easy way. Tried this and it has attached malware on the toolkit download so it won’t work the easy way. Not tech savvy enough to do it the hard way. Not happy!
im trying to do this the easy way and when i try to do the unlock procedure it doesnt go to the screen of unlock bootloader. it just goes straight to the fastboot screen. please help
Carey was right, step missing between 3 and 4 in the ‘Third’ phase of the Hard option ie. in ‘Unlock the Boot Loader’. I just did this process on my Telstra Galaxy nexus. To get around the issues with the Samsung USB drivers, you will need to install the Samsung ADB drivers which can be found on the Samsung site. Follow the Google page for OES USB drivers and look for the I5i5 model. Then use the exe to install the drivers. I still had problems and had to do the missing step of putting your phone into FastBoot mode… Read more »
Hey Daniel, I have been meaning to do this to my nexus for some time but was a little worried about bricking, my phone and losing all my data. But I have just done it and it works great thanks very much for the write up…
Once again I will say it, if these updates are so easy to do (as they obviously are for techie types) why on earth is there no one making themselves a fortune by starting up a business offering this service for the thousands of non-techie Android users who want the latest updates on their phones, and cant afford to buy a phone outright. Both methods described here would scare the hell out of non-techies worried about losing their phone! C’mon experts out there, do any of you have the guts to provide this service?
I do this for people all the time if they ask me, but it’s generally only people I know. It also is as easy as you see above, it really is NOT that hard.
Thank you! this was a perfect guide for getting JB on my nexus
Hey Daniel, thanks for the great write up, answered my question with the “hard” method about if i should just go straight from 4.04 to 4.2 or flash stock google 4.04 and get the updates. I had unlocked the bootloader a while back (thanks to Uncle Phil N recommendation) have been giving the carriers “one more week”. On a mac, so its was the hard way or the highway… but its not that hard, hardest part was sussing out the mac command lines and differences. Only issue i had on the Mac side was the final step of flash-all.sh I… Read more »
Would love to do this, but is there much of a danger of ‘bricking’ my phone/being unable to connect to Telstra or what ever?
I was successful, after a while, using the “hard way”. I’ve never really read (let alone attempted) anything about flashing Android devices before. The hardest part was spending 2 hours trying to get Windows 8 to return my Device ID after running the “fastboot devices” command – not really sure how I fixed it because I had to mess around with drivers, but it did work after I put my device into Fastboot mode (is this necessary? because it is not listed in your instructions… it should be between steps 3 and 4). Also the only SDK download I could… Read more »
Does it matter if I use Windows 8? Any known problems? I only have Windows 8 and Ubuntu 12.10 as available operating systems.
I have done this on XP, Vista(shudder) and Win7, haven’t done Win 8 yet but it really shouldn’t matter.
hmmm i can’t even get past 3rd step, unlock bootloader.
i have all files in the sdk as mentioned. open terminal(after some troubleshooting) and type in fastboot devices, says command not valid?
Are you in the same directory as the fastboot executable file? It seems that you aren’t. If you’re on windows, you’ll probably have this directory:
C:program files (x86)androidandroid-sdkplatform-tools
Change directory into that, THEN try ‘fastboot devices’ and it should work.
Im on a mac 10.7.5 so i created a keyboard shortcut to terminal and highlighted platform-tools and then initiated the shortcut. nothing works after that. so not sure if im doing it correctly (as per instructions) or if my system is faulty. there aren’t many XDA users on mac…everyone seems to use windows for this process.
Hey NinjaBoy,
Just checking, Macs need a “./” in front of any commands in terminal.
e.g. ./fastboot-mac oem unlock
Within the ‘platform tools’ of the ‘android-sdk-macosx’ pack there is fastboot and fastboot-mac.
I used the fastboot-mac version
hope that helps you get started.
Thanks for your help re the command in terminal, it worked. on that note, i used “adb reboot bootloader” instead of “fastboot devices” and now its in process!! yay!
Dear Readers, If you want timely updates, buy your Nexus phone directly from Google. Google have NEVER EVER promised that Nexus phones purchased from a Carrier will receive timely updates. Keep reading that statement until it sinks in! If you want to buy your Nexus phone subsidised by a 1 or 2 year Carrier repayment plan then you MUST expect that the Carrier will delay those updates as part of their testing, etc. You can cry and rant all you like but the Carriers won’t change. Or you can do as Dan has shown you above and have the latest… Read more »
Hey Geoff, fair points,
But did Google ever warned us that the Nexus phones purchased through carriers would not receive timely updates??
The carrier purchased Nexus S have generally received timely updates after the code has been dropped not to dissimilar to any global variants.
Cheers
the harder way actually is the only way possible with a Mac, right?
Nope, works on Windows.
Get a Galaxy Nexus they said. It’ll get fast updates they said. I did research and got a Galaxy Nexus early this year because I was under the impression that it was pure Android and got updates faster than any other Android phone. What a crock of bull****. I’m just going to sell my POS Galaxy Nexus phone (still on 4.0 mind you) and go back to the iPhone. At least I know I’ll get guaranteed updates and the phone won’t slow down to a snails pace after 9 or so months of usage. Thanks to its terrible resale value,… Read more »
Dude calm down its telstra fault not google the telcos are the one holding back the updates. Before you sell your phone use this toolkit update to 4.2 there are a lot of changes since 4.0
False. It’s Samsung that are delaying the update. Samsung for some reason are handling the software update of locally sold Galaxy Nexus phones and if you look on the Vodafone blog you can see that Samsung has continually delayed delivering the firmware for testing.
If you’d bought an already unlocked nexus device you wouldn’t have this trouble, it was your choice. Buy a Nexus 4 unlocked from Google, and you’ll always have the updates first. Never go on a plan with a network with an Android phone and you won’t have to deal with it.
This is a better toolkit I think. Easier for novices as you just click a load of buttons rather than input numbers.
http://forum.xda-developers.com/showthread.php?t=1766475
my link to efrant’s post on XDA has been deleted? huh?
Can’t see your comment as being deleted in the backend, try posting it again.
Hey Dan great review I am a bit of a noob with this stuff but i have heard of people saying if you do it these ways that it can be easier to get viruses or malware on the phone etc… i was just wondering if you could shed some light on this for me? as i would love to use your easy step on my Galaxy Nexus
Thanks
Not at all, if you re-lock your bootloader at the end of the process, there is NOTHING that updating your phone’s OS will do to make it easier for malware or viruses to attack your phone
Awesome 🙂 Thank you, i may do this once i get my nexus back does it void warranty?
Technically it shouldn’t as this is the exact OS and binaries used by Samsung just minus their approval process but the carriers can be kind of whiny little ____ in this regard. If it’s a hardware fault they should be fixing it anyway, if they think it is software they are more than welcome to flash their own software back to the phone to confirm that it is not a software issue.
Thanks 🙂
Call me a smart arse but the harder way is actually the easier way I think.
Depends on your technical ability, smart arse.
(Called as requested)
For greater clarity the comment about hardware being different is wrong in Australia. There are different bits of hardware to support CDMA in the US – and they don’t have 4.2 releases (see the toro devices on the nexus-images link). This is probably the source of the confusion.
The International Unlocked Galaxy Nexus and the Carrier branded Nexus are the Same, I have seen people trying to tell Galaxy Nexus owners the hardware in the two is different. You will also note I never tell someone to download the TORO version of the firmware.
Might still be clearer to say “Australian-carrier branded phones”. You would assume that most people reading this site would be Australian but you never know (and the Verizon GN is obviously a carrier branded phone that is different to the International Unlocked Galaxy Nexus).
Edit: Also the word ‘carrier’ itself is an Americanism that I’ve only heard people start using here in the last couple of years. I’m sure there’s a lot of people that call them ‘telcos’ or similar.
Note added, we all happy now?
Ha! It’s a nice guide. Well done. But just to muddy the waters – and I know it’s beyond the scope of this guide – you could probably do this without losing all your data by:
1. Backup using this method (http://forum.xda-developers.com/showthread.php?t=1420351)
2. Unlock bootloader.
3. Restore using method from step 1.
4. Flash all partitions from Google factory image manually except the /data partition.
when you flash the system image (as part of that zip file) i am fairly sure you will lose all the data you restored in step 3
Yes, if you use ‘flash-all.bat’ but you can just flash individual partitions from that archive using ‘fastboot flash’ commands, eg. ‘fastboot flash bootloader bootloader-maguro-primelc03.img’, ‘fastboot flash radio radio-maguro-i9250xxlh1.img’, ‘fastboot flash system system.img’, etc. Same with boot and recovery (although I’d flash CWM there instead). There’s no need to flash userdata.img and, as you say, you’ll lose all your data if you do. You might get some quirkiness with settings and stuff but that’s no different to OTA side-effects and can usually be resolved by clearing data for that app (especially system apps like Settings). Anyway, if it doesn’t work out,… Read more »
I think we use ‘carrier’ exclusively when referring to mobile network operators, to distinguish from generic telecommunications companies, which is an incredibly broad class. It’s short for ‘wireless carrier’, which in turn comes from ‘carrier wave’, even though (interestingly, perhaps) mobile signals are not carried by carrier waves.
I’m not sure that’s true either in the US or here. In America, the big ‘carriers’ like Verizon and AT&T offer fixed-line services as well. In Australia, I’m not aware of any mobile service providers that call themselves a carrier. Even LiveConnected call themselves a telco:
http://www.liveconnected.com.au/why-live-connected/who-we-are
In the US, the wireless carriers are actually separate from the fixed-line providers even though they may be owned by the same companies and share perks. Verizon Communications, which provides the landline services and home internet, is a separate company to Verizon Wireless, who provide mobile internet.
In Australia though, telecommunications companies provide both wireless carriage and landline services. I think it would be incorrect to refer to Telstra, for example, as a carrier when talking about the company as a whole, but for the sake of differentiating between their service offerings, using ‘carrier’ to mean wireless/mobile provider is helpful.