
In this second instalment of the Android for Everyone series, we’re going to explore how you can best prepare to switch to Android from iOS. There’s likely to be a lot of personal information stored in your iPhone, iPod or iPad, and you’ll probably want to keep most of that information with you when you begin using an Android device.
We’ll go through how to capture the following personal information types so you can get it onto your new Android phone:
- Address book contacts
- Calendar entries
- Preparing to move from iMessage
- Backing up your photos
- Finding Android versions of your iOS apps
- Preparing your SIM card
- Leaving some things behind
There are a few things we won’t cover in this part of the guide, because they’re not what we’d consider essential for everyone. This includes things like content stored in iTunes (music, TV shows and movies), and maintaining a hybrid setup, whereby you might keep an iOS device and want it to exchange information with an Android (e.g. an Android smartphone and an iPad).
Before we begin, there’s a preliminary step that you’ll really need to do, if you haven’t already. You’ll need to create yourself a Google Account, which you can do easily online. Once you’ve done this, we can get into the basics.
Address book contacts
 This applies for the Address book, but also for your calendar and photos. It’s going to make things far easier if you have your iOS device set up to sync with iTunes on your desktop, be it Windows or Mac.
Setting this up will cause your iOS device to keep a backup of its data on your desktop, which you can more easily transport to a new Android device. iOS devices lack a native ‘export’ function to free your personal information to take it somewhere else, so unfortunately it’s pretty much a pre-requisite to use a desktop to facilitate the transfer.
There is a way to do this if you use iCloud and don’t sync with a desktop, but it’s a more advanced topic.
So, with the Address book, the key element is to get the data to your desktop. On a Mac, iTunes will give you the option to sync your iOS address book with the Mac Address book, and this is the easiest way to do it. Windows gives you similar options, allowing you to sync your address book to Windows Contacts or Outlook Express (options may vary depending on what you’ve got installed).
The result you’re after, regardless of platform, is getting your contact list into a format called VCF (or virtual card format). This is a specially formatted text file which can be used to take contact from one app or service to another. In this case, we’ll be using VCF to take data from your iOS device and into Google’s cloud, which will allow you to access your contacts on any Android device.
The instructions differ by platform, so please check the below links for the instructions that best match your set up:
- Export Mac Address Book contacts to a VCard (.vcf) file
- Export Windows Contacts (Win 7) to VCF
- Export Outlook Express address book to VCF
Once you’ve got your contacts into a VCF file (or potentially, a number of VCF files) the next step is to import these contacts into Google Contacts. Google Contacts is a cloud service (somewhat similar to iCloud) which stores all your address book details online, which you can then sync to your Android devices, desktop contact books, and other apps as well.
Google has an easy to follow guide on importing VCF files into its Contacts service. Simply upload your files following these steps, and your contacts will be in the cloud ready to go.
Calendar entries
 If you use the calendar on your iOS device and it isn’t set up to sync with any online services (e.g. iCloud, Exchange or the like) then you’ll need a way to get this data across.
Much as with the Address book, the first step is syncing this data from your iOS device to the desktop. iTunes also facilitates this, allowing you to sync to the system Calendar application (on Mac) or to Outlook (on Windows). The process for syncing with Calendar on Mac is pretty easy; just enable the option in iTunes and it’ll copy your data on your next sync.
For Windows, it can be a little more tricky. This guide gives a good overview of two options to sync Calendars with your Windows desktop, and should give you the tools you need to get that data ready to go.
Again, the end-result here is to get your Calendar data into a usable file format, and in this case, the format is ICS (Internet Calendar format).
- Export Mac Calendar data to ICS
- Export Outlook Calendar to ICS (Detailed Guide)
Google has a useful guide on importing ICS files into Calendar, which you should be able to follow quite easily. Again, once your data is in Google Calendar, getting it onto your Android device is a piece of cake.
Moving from iMessage
Moving from iMessage is much less about keeping your messaging data (which is a rather difficult task) and more about ensuring that when you switch to Android, your previous use of iMessage won’t hinder other iOS users sending you messages.
iMessage is an Apple service that allows users to exchange short messages with each other using data instead of SMS (think of it as instant messaging). It’s great if you use iOS devices because you can save costs on sending SMS to other iOS users. However, it presents a bit of an issue when switching to another platform, because unless you un-register your mobile number with Apple’s services, other iOS devices will still attempt to send messages to you via iMessage, which doesn’t work on Android.
Accordingly, it’s important to de-register from iMessage before you switch. This simple graphic demonstrates the process:
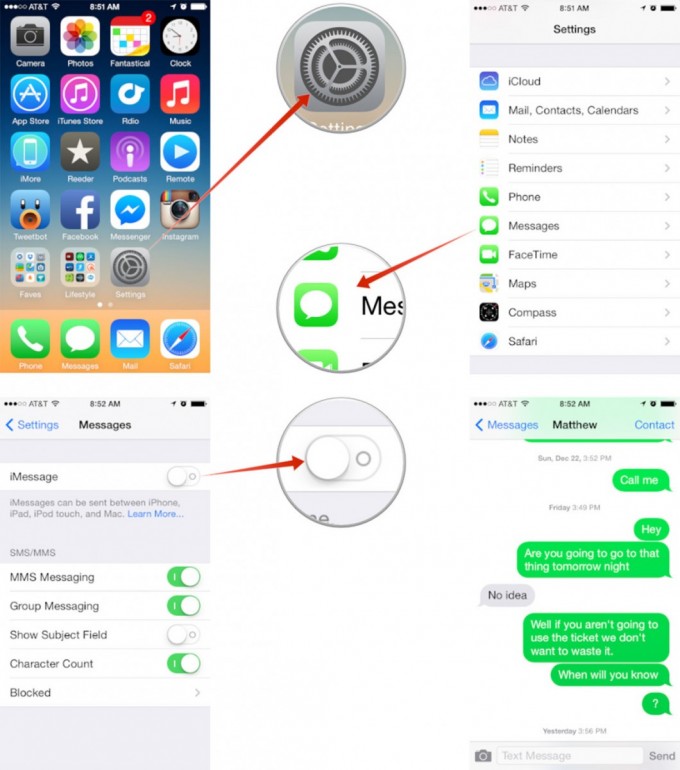
Once you’ve turned iMessage off, send a few messages to a friend with an iPhone and make sure the messages you receive back are green (rather than blue). This will indicate a successful deactivation.
If somehow you’ve already disposed of your iOS device before deactivating iMessage, your options are a bit trickier. You’ll need to give Apple Support a call and ask for technical support. Quote them your mobile number and your Apple ID (email address) and they should be able to fix things up for you.
Once this step is complete, you’re ready to move on.
Backing up your photos
Backing up your photos is fairly straight forward. On Mac, iTunes offers you the ability to back your photos up to iPhoto (or to a folder on your computer), and is fairly quick and easy. Just tick the box and away it goes.
With Windows, there are a few other options. Regardless of your platform (Mac or Windows), Apple has this simple guide to follow which sets out the process to get your photos from your iOS device onto your computer.
Finding Android replacements for your iOS apps
 Chances are you’ve installed a number of applications on your iOS device, and if you enjoy using those apps, you’ll want to find Android equivalents for them.
As iOS and Android are two different platforms (just like Mac and Windows are), you can’t just install your iOS apps onto an Android device. This simply isn’t possible.
However, for most popular applications, there are Android equivalents for iOS applications. Apps like Facebook, Twitter, Angry Birds, and many more have Android versions available. Some others might not have Android versions, but there may be equivalent versions you can try to see if they meet your needs.
The easiest way to set about this task is to identify what apps you have on your iOS device that you’ll want on Android. Writing out a list is probably the easiest way.
Head on over to Google’s Play Store (the Android equivalent of the App Store for iOS) and sign in using the Google account you created earlier. You can then search the Play Store for all the apps you want. As an added bonus, once you’ve obtained your Android device and linked it to your Google account, you can use the web-based Play Store to install apps on your Android straight from the list of apps you’ve prepared.
Just like iOS, Android has many free apps, but some require purchase. If you’ve bought an app for iOS, you can’t transfer your ‘licence’ of that application to Android, so unfortunately, a switch might involve a bit of money in purchasing non-free apps. However, it’s a one time purchase, and as with iOS, once you own an app, you can install it on any Android device you own, including multiple devices.
Preparing your SIM card
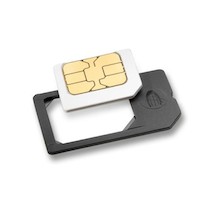 Depending on which iOS device you use, your SIM card might not be in a format or size that can be used in an Android. Virtually all Android devices take SIM cards in the Micro-SIM format, which is used by devices like the iPhone 4 and 4S. Here’s a quick rundown of what you’ll need to do with your SIM card to get it ready for Android:
- iPhone 3, 3GS or similar: Your device will have a standard SIM and will need to be cut down or replaced with a Micro SIM. Take your current SIM into one of your carrier’s stores (e.g. a Telstra, Optus or Vodafone shop) and they should be able to give you a replacement.
- iPhone 4 or 4S: You already have a Micro SIM and can take it out of your iPhone and pop it straight into most Androids.
- iPhone 5 or 5S: You’ve got a Nano SIM, which is too small to use in an Android device. You can either buy a Nano-to-Micro SIM converter (which is NOT recommended, these can damage your device), or a better suggestion is to visit your carrier and ask for a replacement Micro SIM.
In most cases, a replacement SIM card is free, and usually a fairly quick transaction. With Optus, for example, you can simply walk into an Optus store, ask for a blank Micro SIM, and you can complete the SIM swap yourself using Optus online services; it’s very easy.
Once you’ve got your SIM card ready, and once you’ve backed up all your essential data as outlined above, you’re ready to move into your new Android, which we’ll cover in the next edition of the guide.
Leaving some things behind
Sadly, there’s some things you just can’t take with you from iOS to Android. Different platforms are not a hundred percent compatible with each other, and some data just can’t be moved across. The types of content listed below you can’t really take with you:
- Saved app and game data (e.g. Angry Birds levels, settings saved in your apps, etc)
- iMessage and Facetime (there are equivalents, but you can’t use these services on Android)
- SMS and MMS you’ve sent/received (there are ways to back these up, but they’re out of the scope of this guide)
- Some iTunes content — music you can usually get onto Android, but TV shows and Movies from iTunes aren’t Android friendly
- Ringtones, although you can with some conversion apps
- Visual Voicemail (if you’ve got this service on your iPhone, I’d recommend calling your carrier and asking them to disable it before you switch)
There are other content types that you probably can backup to your computer or transition to Android, but this guide is designed to cover the major things that the majority of users will want to transition. If you can think of other examples which should be covered here, let us know in the comments and we’ll document what we can.
Please note, we are well aware that there are other ways to move from iOS to Android. We’ve just picked out the main concerns, and the easiest ways we could find to move data across.


Dammit I wish I read this earlier. If I follow these steps and I’ve already moved my contacts / sms’ over, will it create duplications? I feel mildly retarded.
There is also the Smoothsync apps for syncing contacts & calendars from iCould to Android. No need for exporting anything, just purchase & set-up – done.
Nicely written!